

| A practical guide to mapping routes that match your board, your skill level, and the ground beneath your wheels. |
An electric skateboard turns a plain commute or a weekend outing into something closer to an adventure, but a good ride rarely happens by accident. The riders who get the most miles, the smoothest experience, and the fewest surprises are usually the ones who thought about the route before they ever stepped on the deck. Planning means understanding your board’s limits, reading the terrain, timing the weather and daylight correctly, and building in a few safety margins so a fun ride never turns into a long walk home. This guide walks through the practical steps to map out a route that matches your skill level, board, and the terrain you plan to cover.
Start With Your Board’s Real Range
Before picking a destination, get honest about how far your board can actually travel on a single charge. Marketing numbers are usually measured under close-to-ideal conditions: a light rider, flat pavement, and a moderate cruising speed. Your real-world number will almost always be lower, and understanding the factors that affect how far an electric skateboard can travel on one charge helps you plan a route you can actually complete. Rider weight, top speed, wind, tire pressure, and terrain all pull from the same battery, and a route that looks short on a map can quietly eat through half a charge if it climbs a few hills along the way.
A simple rule many experienced riders use is to plan round trips that use no more than 60 to 70 percent of the board’s rated range. That leaves a buffer for detours, colder weather, or a stronger headwind on the way back. If you are still learning how much distance you can reliably squeeze from a full charge, it is worth reading through some tested strategies for maximizing range before committing to longer routes.
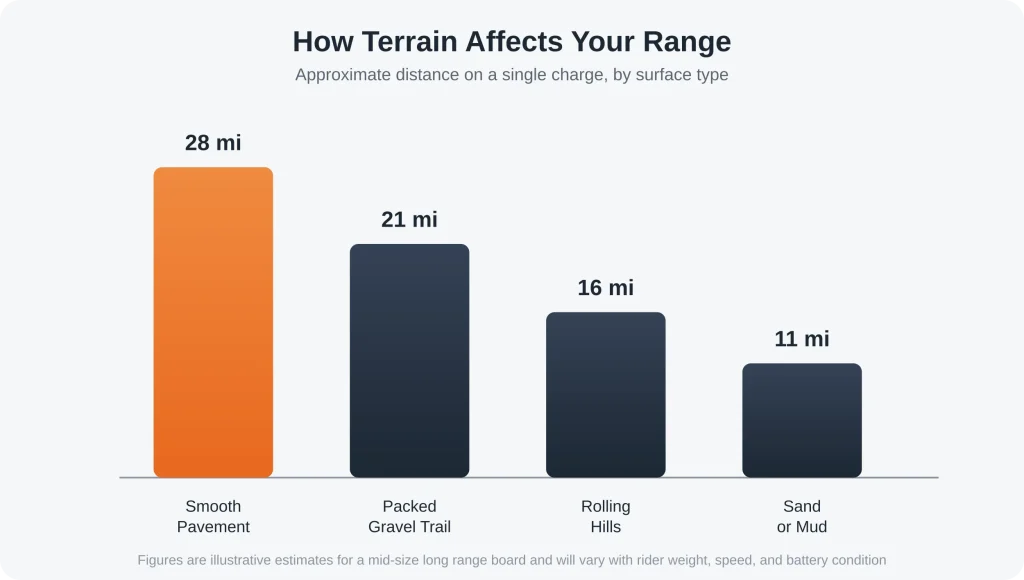
Surface type has a bigger effect on range than most new riders expect.
Terrain plays a bigger role in range than most new riders expect. Smooth pavement is the most efficient surface, while packed gravel, rolling hills, and loose sand or mud all demand more power and shorten the distance you can cover on a single charge.
Match the Terrain to Your Board and Skill Level
Not every board is built for the same ground, and matching your route to your equipment is one of the simplest ways to avoid trouble. A street-oriented deck with small, hard wheels is happiest on smooth asphalt and bike paths, while boards built around off-road safety design principles, larger pneumatic tires, dual motors, and reinforced decks are made to handle gravel, dirt, and uneven trail systems. If your planned route includes loose surfaces, roots, or real elevation change, riding a board that was not designed for it turns a fun outing into a risky one.
Trail difficulty deserves the same respect a hiker would give it. A route through rolling neighborhood streets is a very different commitment than one that winds through mountain switchbacks and steep off-road terrain, and riders who take all-terrain boards into technical ground generally recommend scouting a new trail on foot or bike first, at least the first time, so you know exactly what the board will be asked to handle before you commit to it at speed.
Map the Route Before You Leave
Once you know your range and your terrain, sit down with a map, digital or paper, and actually plan the path rather than improvising it. Note the total distance, the elevation profile if the route includes hills, and any spots where pavement changes to gravel or dirt. Mark potential rest stops, water fountains, or coffee shops where you could pause if needed.
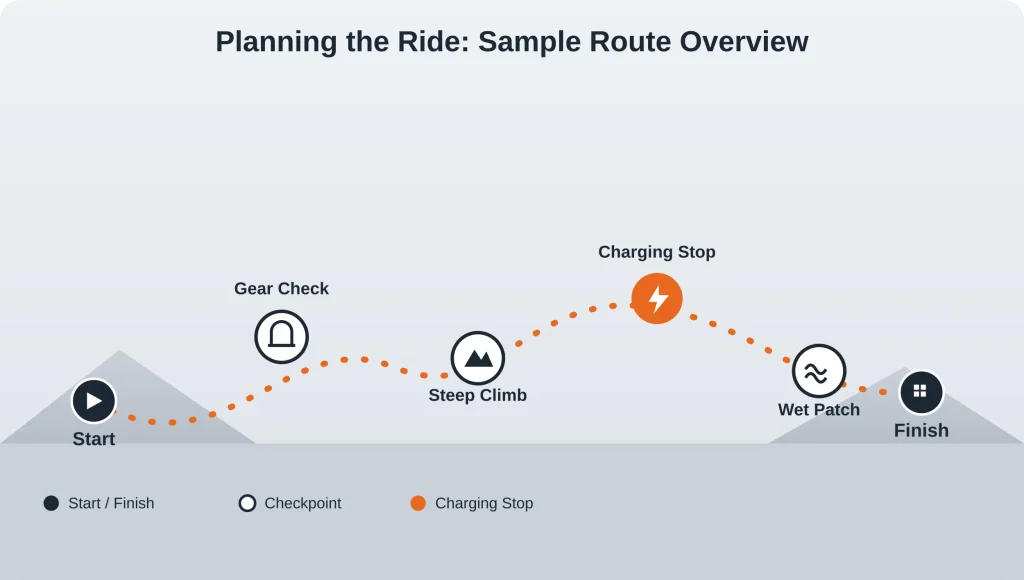
A mapped route with waypoints removes most of the guesswork.
For group rides or longer trips, it helps to build in checkpoints along the way. Riders who organize group outings often use a checkpoint system for regrouping mid-ride, stopping at natural breaks in the route so everyone can catch up, refill water, and compare battery levels together. Even solo riders benefit from picking two or three mental checkpoints in advance: places where you will stop, check your remaining charge, and decide honestly whether to continue or turn back.
Time the Ride Around Weather, Traffic, and Light
The best route on paper can turn into a poor decision if the timing is wrong. Check the forecast before you leave, since wet pavement and wet electronics do not mix well on most boards, and cold weather can noticeably shorten battery range. Midday traffic patterns matter too, especially on any route that shares space with cars, so a path that feels calm on a Sunday morning might be far busier during a weekday commute.
Daylight is often overlooked. If your route will end near sunset or push into the evening, visibility becomes a real safety concern, since electric skateboards are quiet and can catch pedestrians and drivers off guard. Riders who log regular evening or early morning miles tend to add their own strobing lights and reflective gear rather than relying on a board’s factory reflectors, and it is worth reviewing some practical visibility habits from experienced night riders before your first after-dark route.
Build In a Backup Plan
Even a well-planned route benefits from a backup plan. Share your intended path and expected return time with someone before you leave, especially for longer or more remote routes. Keep your phone charged and consider carrying a small battery pack, since a dead phone on an unfamiliar trail removes your map, your flashlight, and your ability to call for help all at once.
It is also worth reviewing the official safety guidance for your board before tackling anything ambitious, since manufacturer recommendations on speed limits, riding conditions, and appropriate use cover situations that are easy to overlook when you are focused on picking a scenic route. A route plan is not complete until you have also planned for what happens if something goes wrong, whether that is a flat tire, a drained battery, or sudden rain.
Run Through a Pre-Ride Checklist
A few minutes of preparation before you leave the driveway prevents most of the problems that show up mid-route. Confirm the battery is charged for the full distance you are planning, inspect wheels, bearings, and bolts for looseness, and put on your full protective gear before you start moving.
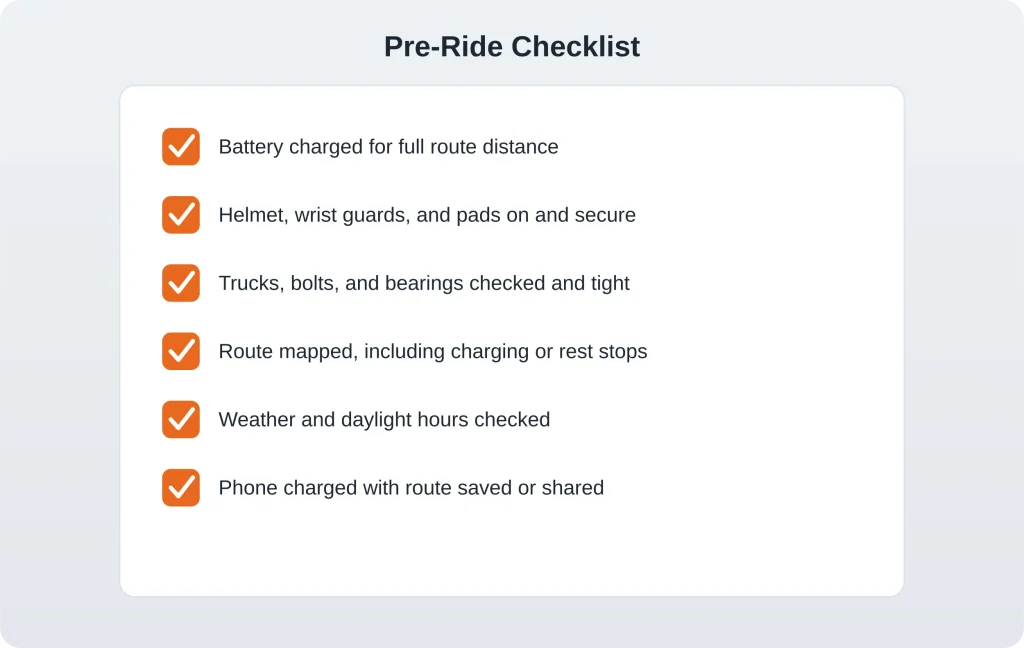
A short checklist catches most problems before they start.
Skipping this step is one of the common mistakes that catch new electric skateboarders off guard, from misjudging throttle response to underestimating how a surface change affects handling. Routine care matters just as much: a board that has been cleaned, tightened, and inspected on a consistent maintenance schedule is simply more predictable on the road, which lowers the odds of a mechanical surprise turning your planned route into a long walk home.
Route Planning Quick Reference
| Terrain | Recommended Setup | Key Precaution |
| Smooth city streets | Street or longboard style deck | Watch for traffic and pedestrians |
| Packed gravel or light trail | All-terrain two-wheel drive board | Check tire pressure before you leave |
| Rolling hills | Dual motor setup with strong torque | Plan shorter loops and watch the battery closely |
| Steep or technical trail | Four-wheel drive with reinforced deck | Scout on foot first if it is a new route |
Choosing the Right Board for the Route You Have in Mind
Route planning and board choice are really two sides of the same decision. A daily commute on smooth city streets calls for a different setup than a weekend trip through dirt trails and rolling hills. A nimble two-wheel drive board like the M24 2WD handles mixed pavement and light trail sections with an easy learning curve, while an allongboard-style deck such as the ET Pro 2.0 favors longer, smoother routes where carving and comfortable range matter more than raw climbing power.
Riders who split their time evenly between city streets and rougher terrain often lean toward something like the ET2 Pro, which balances speed and stability across both surfaces, while anyone planning routes with serious elevation gain or loose, technical ground should look at a four-wheel drive option like the M24 Pro 4WD for the extra torque and control it offers on steep climbs.
If you are still deciding between models, working through a comparison of which board actually fits your riding style is a useful step before finalizing a route that depends on it, since the right board can turn a route from merely possible into genuinely enjoyable.
Final Thoughts
A safe and efficient route rarely comes down to luck. It comes from understanding your board’s real range, respecting the terrain, timing the ride around weather and daylight, and building in a few safety margins before you ever leave the driveway. Take the time to plan the way experienced riders do, and every ride becomes less about hoping for the best and more about knowing exactly what to expect.